Craft enthusiasts know the frustration: a tangle of embroidery floss, spools that roll off tables, and supplies scattered across every surface. While commercial storage systems promise organization, they often carry hefty price tags that rival the cost of the supplies themselves. A growing number of makers are turning to an unexpected solution hiding in their recycling bins—clear plastic bottles.
This simple repurposing project addresses a universal problem in sewing rooms and craft spaces. Thread spools, in particular, present a storage challenge because they need to remain untangled while staying easily accessible. Traditional drawer storage often leads to knots, while commercial dispensers can cost $30 to $80 for a single unit. The bottle-based approach offers a zero-waste alternative that requires minimal investment and can be customized to fit any workspace.
Why Plastic Bottles Work for Craft Storage
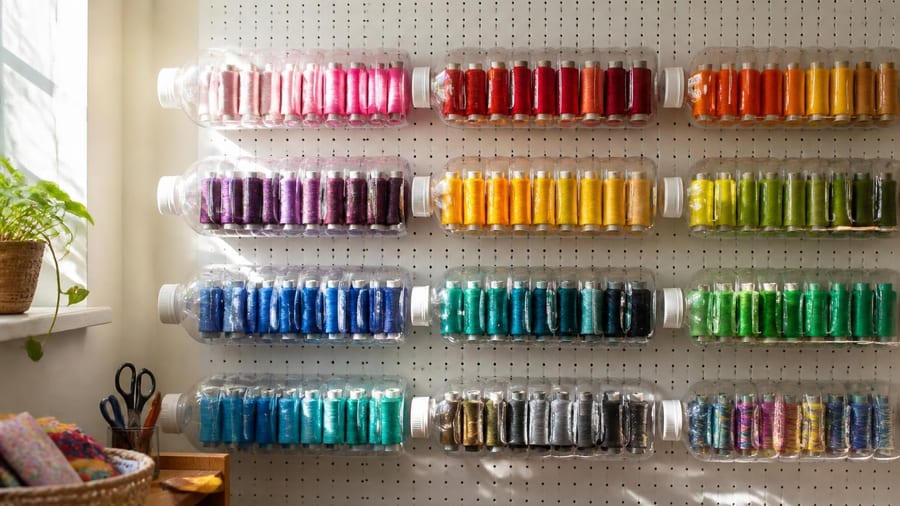
The transparent nature of most water and soda bottles provides immediate visual inventory—crafters can see thread colors at a glance without opening containers or rummaging through drawers. The cylindrical shape naturally accommodates spool geometry, while the rigid plastic maintains structure even when loaded with multiple reels.
Standard 1-liter and 2-liter bottles offer sufficient width to hold spools horizontally on suspended rods. This orientation prevents thread from unwinding accidentally while allowing controlled dispensing through small exit holes. The configuration keeps dust off thread while maintaining accessibility, addressing two concerns that plague open-shelf storage.
Material scientists note that PET plastic—the polymer used in most beverage bottles—resists moisture and maintains dimensional stability. Unlike cardboard organizers that warp in humid climates, plastic bottles protect thread from environmental damage. The airtight seal of a reattached cap creates a microclimate that preserves thread quality over months of storage.
Essential Tools and Material Selection
Executing this project successfully depends on choosing appropriate bottles and cutting tools. Not all plastic containers work equally well. Look for bottles with:
- Clear, untinted plastic for easy color identification
- Smooth cylindrical sections without heavy ribbing or indentations
- Sufficient diameter to accommodate your largest spools with clearance
- Caps that screw on securely to seal the finished organizer
The cutting method significantly impacts the final product's functionality and safety. Hot-cutting tools designed for plastic create smooth, sealed edges that won't snag thread or cause fraying. Traditional scissors or utility knives leave rougher cuts that may require sanding or heat-smoothing with a lighter (carefully applied to melt rough edges).
For the internal suspension system, rigid materials work best. Wooden skewers, bamboo chopsticks, or metal rods provide stable support for loaded spools. Plastic drinking straws offer a lightweight option, though they may bow under the weight of 8 to 12 full spools. Measure your chosen material against the bottle's interior width, allowing a few millimeters on each side for secure seating in punctured holes.
Step-by-Step Construction Process
Begin by removing all labels from your chosen bottle and washing it thoroughly with dish soap. Any residual beverage or adhesive will interfere with thread quality. Allow the bottle to dry completely—moisture trapped inside can lead to mildew on natural-fiber threads.
Mark a cutting line lengthwise down the bottle's center using a permanent marker and a ruler as a guide. Most bottles have a molded seam that serves as a natural cutting reference. Stop your cut approximately 1 inch before the bottle's base to create a hinged design that opens and closes.
The hinged construction allows you to load spools easily while maintaining a closed system that protects thread from dust and UV exposure.
Test-fit your spools inside the opened bottle to determine optimal spacing for the support rods. Mark hole positions on opposite sides of each half-bottle section, ensuring alignment so rods sit level. Puncture these anchor holes using your hot knife or a heated metal skewer. Add corresponding exit holes directly below each spool position—these should be just large enough for thread to pass through smoothly without allowing the spool itself to slip out.
Thread your support rods through the anchor holes, then load spools onto each rod before securing the opposite end. Pull each thread through its designated exit hole and close the bottle. The cap can be removed or left in place depending on whether you want access to the top spools.
Optimization Strategies for Maximum Efficiency
Once you've mastered the basic construction, several modifications can enhance functionality. Consider these refinements:
- Color-code exit holes with permanent marker to match thread colors for faster selection
- Add small rubber grommets to exit holes to reduce friction and prevent thread fraying
- Use different bottle sizes for different spool types—smaller bottles for embroidery floss, larger ones for sewing thread
- Attach bottles to walls or pegboards using mounting brackets to save counter space
- Create labels on masking tape indicating thread types or project assignments
For crafters who work with metallics, silks, or other delicate threads, consider adding a silica gel packet inside the bottle before sealing. This absorbs residual humidity and prevents tarnishing or degradation. Small packets designed for medication bottles fit easily and can be replaced every 6 to 12 months.
Adapting the Design for Other Craft Supplies
The bottle organizer concept extends beyond thread storage. Modify the basic design to accommodate:
| Supply Type | Bottle Size | Modification |
|---|---|---|
| Ribbon spools | 2-liter | Wider exit holes, reinforced rods |
| Washi tape | 1-liter | Single central rod, no exit holes |
| Jewelry wire | 500ml | Smaller exit holes, tension control |
| Elastic cord | 1.5-liter | Rubber grommets, controlled dispensing |
Each variation follows the same core principle: contained storage that allows controlled access. The transparent design and repurposed materials maintain cost-effectiveness across applications.
Safety Considerations and Best Practices
When working with cutting tools and heat sources, proper safety measures prevent injury. Always work in a well-ventilated area when using hot knives or melting plastic—PET releases fumes that should not be inhaled in concentration. A simple respirator mask provides adequate protection for occasional crafting.
Sharp edges on cut plastic can cause cuts or snag skin. If using cold-cutting methods like scissors or utility knives, smooth all edges with fine-grit sandpaper. A quick pass with a lighter held several inches away can melt roughness without creating drips—work in short passes and never hold flame directly against plastic for extended periods.
Store completed organizers away from direct sunlight and heat sources. While PET plastic has good UV resistance, prolonged exposure can cause yellowing and brittleness over time. Room-temperature storage in craft rooms or closets provides ideal conditions for both container and contents.
This article provides general craft guidance and does not replace advice from professional organizers or safety specialists regarding workspace setup or material handling.